Tuesday, April 17, 2012

Desk Reveal!

Well I've been absent from the blogworld for the past week taking care of some sick kiddos. Now that everyone is on the mend, it's time for an update on my desk organization!

As you may remember, we started here with my desk in the corner of our playroom:


First, I started by clearing everything out so that I could start with a fresh slate:


Then I figured out how I need this area to function and created some custom drawer dividers to house the mountains of paperwork that flow through this area:


Next it was time to start bringing things back into the space. I was determined to only bring back necessary items and find a great solution for storing paperwork. Important documents went into the family binder or into the drawer in the correct section. I am using an accordion file to store office supplies such as labels, blank paper and photo paper. This sits next to my desk for easy access.


For the main drawer I used a sectional divider which I have had for years and was not in use, which is great for keeping pens, post-its and smaller items separated and tidy.


Another drawer is for camera and camcorder supplies - I used a cardboard divider that was in a box used for canning jars - works great for now! Down the road I would love to have a more permanent and pretty solution but for now this is functional. (The open section is for my camera, which I was using at the time to take the picture of course!)


The other drawers hold my label printer and blank DVDs, I even have room to spare!

Remember the before:


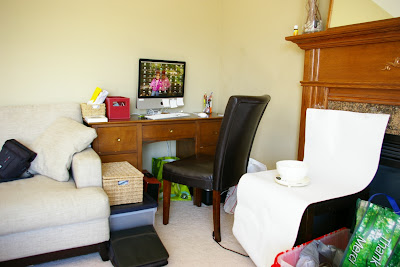
And after:


In total I spent $1.25 for the pretty bowl (dollar store), $1.25 for the garbage can (dollar store) and I purchased two standing magazine holders to sit on the desk to hold books, magazines and paperwork for around $5 at IKEA.

I would love to incorporate some pretty design elements into this area before moving on but the purpose of this journey is to make each area functional. Once each area has been de-cluttered and organized, I can think about the design aspect.

The best part? I have been able to keep it tidy and organized for an entire week and it has been no effort at all!

Tuesday, April 10, 2012

DIY: Custom Filing Dividers

Every time I tackle a project, I end up doing it in the most complicated way, and when all is said and done, I think to myself, "Well, that turned out nice but should've taken the easy route". This can be said for my latest project which is to create a filing system in one of my desk drawers. It was a fun project but since I only get snippets of time to complete, I couldn't wait to be done!

Check out the end result:


Here is how I did it.

1. Take your drawer and measure.


2. Cut out a template for your dividers. I used a file folder since it is thicker than regular paper and you will be tracing it onto cardboard so this makes it easier.


4. Take a piece of cardboard to use as your divider - I used a diaper box since they are made of sturdy cardboard.


5. Glue pretty paper (or not, if you aren't picky) to each side. I was lucky enough to snag some rolls of wallpaper at a thrift store for $1 each, so that is what I used. Wallpaper is a great option because it is more durable than regular paper.


6. Using your template, trace it onto the paper with a pencil.


7. Cut along the pencil lines - I used an exacto knife and heavy ruler on a cutting mat.


8. The raw edge of the cardboard will show, so I cut a narrow strip of wallpaper and glued it to the top edge.


9. Try it on for size! If you need to you can trim the edges at this point so that it fits snugly in your drawer.


10. If it fits snugly enough, you might be able to stop here but I used pushpins to create a "track" for the divider - you could use some different options here but this worked for me since the drawer is made of fairly soft wood.


11. Make as many as you need - I made six of them for my drawer:


The next step is to make labels for the tabs and this drawer will be complete!

If you wanted to cut the time this project took me in half, instead of creating a fancy tabbed top on your divider, you could just use a rectangular piece of cardboard and simply wrap your paper over the top - a lot less cutting and gluing that way!

Anyone have any creative ways to create desk filing organization? Share your ideas!


Monday, April 9, 2012

Family Binder

Just a quick post today - I am nearing the end of my desk organization project and I'm super happy with the way it is turning out! I already feel happier and more motivated as I sit here. One thing that came about as I was organizing my desk was that I needed a central place to store important documents that I refer to on a regular basis. Not something that I have to dig up out of a filing cabinet, but something that is easy to refer to when I need the information. Normally these documents would be in one of my drawers along with all kinds of other paper "junk", and if I needed to access them I would be rummaging through this massive pile until I found what I was looking for. So many times I couldn't find it only to find it on a second or even third search through "the pile".

So as I was sorting through all of my loose paperwork, I pulled aside these documents and put them into plastic sleeves into a binder. Now I can simply grab the binder and access the info that I need. Some examples of what is in this binder are the summary sheet of important information for my daughter's school, our current insurance policies, mortgage papers and current property tax bill.

This will eventually turn into what I am calling the "Family Binder", there's lots of work to be done but it's a start!

Thursday, April 5, 2012

Operation Office Space

I have decided that I am going to start my first organizing project with my "office" space. Like many of you, I don't have an entire room dedicated as an office. All I have is a corner in our family room that houses a desk that I picked up at a thrift store for $25! I love finding previously loved items and giving them a new home, besides where else could you find a solid piece of wood furniture at such a great price?


Clearly there is WAY too much going on in this space. I spend a lot of time in this corner and when it gets out of control like this it is just adds to the stress in life.

Here is what's going on!

This is my "garbage bag". Isn't that sad? Obviously I need to find something better than this! What an eyesore.


The bottom right drawer houses, well, um, I'm actually not sure. Because I never go in that drawer. I'm pretty sure it has labels and office supplies but they are not accessible without digging through so I just never bother. Definitely a space that can be utilized better!


I have a basket sitting on top of a filing box which I just dump random papers in and when I'm looking for something this is the first place I look. Sometimes what I'm looking for is there, often not. Clearly not working.


Pens, receipts, random things... My husband and I can often be found digging in this drawer looking for who knows what!


Camera and camcorder equipment and cords related to the computer are in this drawer. At least there is some purpose to this one but still, lots of room for improvement!


Another drawer that is under-utilized, mostly because it is blocked!


On my desk I have a few baskets which end up holding bills and various paper items.


Now to start the purge and organization process. I started with emptying out everything from this area. All the drawers and everything on and around the desk, except the computer. Then I dusted and vacuumed since this area is often neglected!


Ahh, feels so much better already. My next step will be to go through everything and only bring back the things that are necessary in this space, and set up good systems so that this area can serve its purpose and function the way I need it to.

Can you believe this much stuff was crammed into that tiny space??


Just to refresh, let's take a quick look at where we started:


And where we are now:


Stay tuned to see how I tackle this project, some inspiration I found to help me along the way as well as a DIY project for a new filing system that I am going to share with you!

Wednesday, April 4, 2012

Let's start the reveal!

Hello folks! Yesterday I promised I would "come clean", so here it is. You will see what my house looks like if you were to just show up at my door, right now. I am going to start with the main level of our home.

Let's begin with the family room, or as we call it, the play room. This room is multi-functional. It acts as space for the kids to play, for us to hang out as a family, play board games, read books and even watch an occasional movie. It also houses my office area where I blog, work on websites, update my etsy shop, pay bills, and a million other things!


Let's talk about what's working in this room. The ottoman has tons of storage - this rocks. Currently we are using one for toys, one for board games, one for blankets, and one for my office supplies related to my online etsy shop.


The shelving unit works great for the kids books and toys, but even though I always vow to only keep toys that fit in it in the playroom, other toys gradually start to trickle in and what doesn't fit in this unit, overcrowds the space. Plus, I need to find a better labeling system so that the kids can put their toys away more easily.


And there is an embarrassing amount of clutter "hiding" behind the half wall, one of those out of site, out of mind areas.


What definitely isn't working for me is my office space. I have too much stuff for such a small space. I either need to minimize the amount of clutter in this area, or I need to expand on the storage that I currently have available. Maybe a little of both? I also need to figure out a better way to update my etsy shop from this space without it intruding on our family area.

Phew! I almost feel better now that I've shared this. Now it's time to get to work!

Tuesday, April 3, 2012

Coming Clean

I'm often asked, "How do you do it all?" I am a wife and mother of three beautiful children under 5. I cook, clean, bake (usually from scratch), I scrapbook, sew, jog, have an online etsy shop (which has been neglected for a long while), the list goes on... Well, today I am uncovering the truth. The truth that I don't 'do it all'. I am coming clean and showing you real life in my home. Messy rooms, unmade beds, laundry piles. It's a struggle to get dinner on the table each day!

It's not like we (I am saying 'we' here since this is a family problem) don't have legitimate reasons for our lack of organization. Our little family is a busy one - taking care of the kids alone is a fulltime job. So I could say, well it is what it is, I am doing the best I can. My kids are happy, well fed, loved, who cares about the "mess"? But the truth is that I spend a lot of wasted time looking for things, or I get stressed out if someone is going to "pop by", even if it is one of my own family members! I want to get organized so that our family life runs more smoothly, which will translate into more time for each other and less stress!

This blog may seem like just one extra thing on my "to do" list, but it will force me to be accountable and hopefully I can inspire my readers to "come clean" and work with me towards a cleaner, more organized and less stressful life!

I am not going to hold back - my photos will show it exactly how it is. Here is a sneak peek of what is to come:

My plan is to go through the house, room by room, area by area, figure out what is working and what is not, dejunk, declutter, clean and organize. Along the way I will share my home decor projects, as well as share my ideas and inspiration.

Oh, and I forgot to mention, I will be doing this on a very limited budget, hopefully using what I already own! Buying anything just means I will have more "stuff", and isn't that what got me here in the first place?

Happy organizing!